Spring Boot 2 Logging SLF4j Logback和LOG4j2示例
在这篇文章中,我们将学习如何用Spring Boot有效地记录。我们将看看Spring Boot Starterfor Logging。我们将看看Spring Boot中默认的Logging - Logback和SLF4J。我们还将研究Spring Boot启动器的log4j2。
首先,我们将讨论关于Spring Boot日志功能的几个要点,然后我们将创建一个简单的例子来演示。
Spring Boot 2日志功能概述
日志是任何应用程序的一个非常重要的部分,它有助于对问题进行调试。Spring Boot默认将spring-boot-starter-logging作为spring-boot-starter模块的过渡依赖。默认情况下,Spring Boot包括SLF4J和Logbackimplementations。
如果Logback可用,Spring Boot将选择它作为日志处理器。你可以在application.properties文件中轻松地配置日志级别,而不需要创建特定于日志提供者的配置文件,如logback.xml或log4j.properties。
logging.level.org.springframework.web=INFOlogging.level.org.hibernate=ERRORlogging.level.net.guides=DEBUG
如果你想在控制台之外将数据记录到一个文件中,请按以下方式指定文件名
logging.path=/var/logs/app.logorlogging.file=myapp.log
如果你想对日志配置有更多控制,可以在默认位置创建日志提供者特定的配置文件,Spring Boot会自动使用这些文件。
例如,如果你将logback.xml文件放在根classpath中,Spring Boot将自动使用它来配置日志系统
logback.xml文件
<configuration><appender name="STDOUT"class="ch.qos.logback.core.ConsoleAppender"><encoder><pattern>%d{HH:mm:ss.SSS} [%thread] %-5level %logger{36} - %msg%n</pattern></encoder></appender><appender name="FILE" class="ch.qos.logback.core.FileAppender"><file>app.log</file><encoder><pattern>%date %level [%thread] %logger{10} [%file:%line] %msg%n </pattern></encoder></appender><logger name="com.apress" level="DEBUG" additivity="false"><appender-ref ref="STDOUT" /><appender-ref ref="FILE" /></logger><root level="INFO"><appender-ref ref="STDOUT" /><appender-ref ref="FILE" /></root></configuration>
在Spring Boot中使用Log4j2进行日志记录
如果你想使用其他日志库,如Log4J or Log4j2,而不是Logback,你可以排除spring-boot-starter-logging,并包括各自的日志启动器,如下所示。
<dependency><groupId>org.springframework.boot</groupId><artifactId>spring-boot-starter</artifactId><exclusions><exclusion><groupId>org.springframework.boot</groupId><artifactId>spring-boot-starter-logging</artifactId></exclusion></exclusions></dependency><dependency><groupId>org.springframework.boot</groupId><artifactId>spring-boot-starter-log4j</artifactId></dependency>
现在你可以把log4j.properties文件添加到根classpath中,Spring Boot将自动使用该文件进行日志记录。
日志格式
Spring Boot的默认日志输出类似于以下例子:
2014-03-05 10:57:51.112 INFO 45469 --- [ main] org.apache.catalina.core.StandardEngine : Starting Servlet Engine: Apache Tomcat/7.0.522014-03-05 10:57:51.253 INFO 45469 --- [ost-startStop-1] o.a.c.c.C.[Tomcat].[localhost].[/] : Initializing Spring embedded WebApplicationContext2014-03-05 10:57:51.253 INFO 45469 --- [ost-startStop-1] o.s.web.context.ContextLoader : Root WebApplicationContext: initialization completed in 1358 ms2014-03-05 10:57:51.698 INFO 45469 --- [ost-startStop-1] o.s.b.c.e.ServletRegistrationBean : Mapping servlet: 'dispatcherServlet' to [/]2014-03-05 10:57:51.702 INFO 45469 --- [ost-startStop-1] o.s.b.c.embedded.FilterRegistrationBean : Mapping filter: 'hiddenHttpMethodFilter' to: [/*]
输出的项目如下。
- 日期和时间:精确到毫秒,易于排序。
- 日志级别。ERROR, WARN, INFO, DEBUG, or TRACE。
- 进程ID。
- 一个---分隔符,以区分实际日志信息的开始。
- 线程名称:包含在方括号中(对于控制台输出可能会被截断)。
- 记录器名称:这通常是源类的名称(通常是缩写)。
- 日志信息。
控制台输出
默认的日志配置是在写信息的时候向控制台回音。默认情况下,ERROR级,****WARN-level,和INFO级消息被记录。你也可以通过用--debug标志启动你的应用程序来启用 "调试 "模式。
你也可以在你的application.properties中指定debug=true。
文件输出
默认情况下,Spring Boot只向控制台记录日志,不写日志文件。如果你想在控制台输出之外写日志文件,你需要设置一个logging.file或logging.path属性(例如,在你的application.properties中)。
到目前为止,我们已经了解了Spring Boot中的日志工作方式和默认配置。现在是时候在我们的项目中使用Spring Boot 2的日志功能了,让我们创建一个例子来演示如何使用Spring Boot 2的日志功能。
简单的Spring Boot 2日志应用
让我们开发一个简单的内存中Spring Boot 2日志应用程序。
1. 创建和导入一个项目
创建Spring Boot应用程序的方法有很多。最简单的方法是在http://start.spring.io/使用Spring Initializr,它是一个在线Spring Boot应用程序生成器。
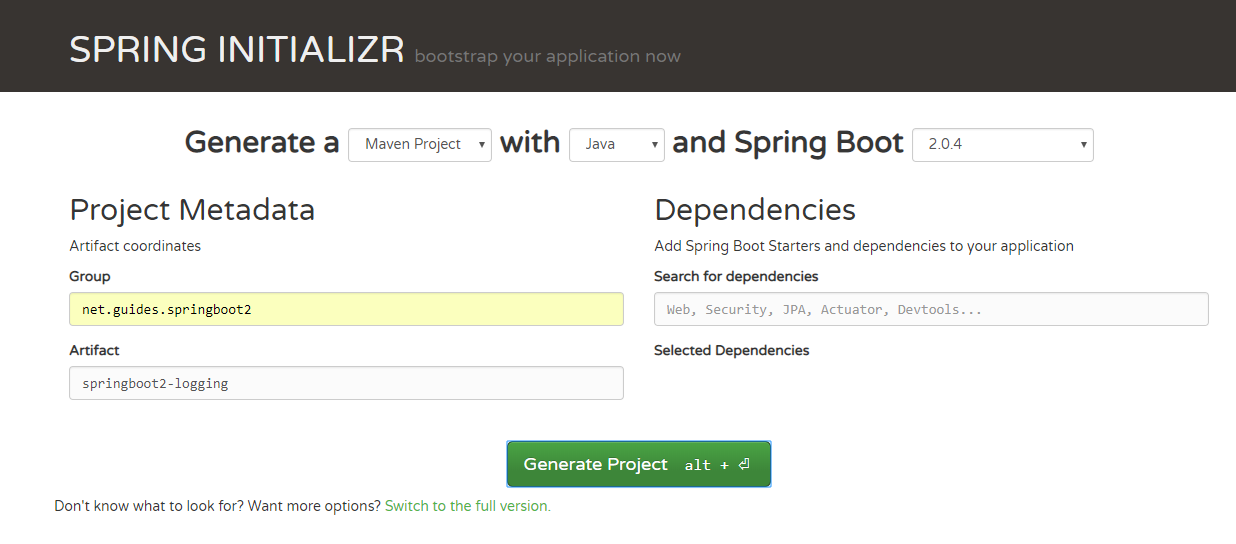
看上面的图,我们指定了以下细节。
Generate。Maven项目
Java版本。1.8 (默认)
Spring Boot:2.0.4
Group: net.guards.springboot2
Artifact: springboot2-logging
Name: springboot2-logging
Package Name: net.guards.springboot2.springboot2-logging
Packaging: jar (这是默认值)
Dependencies: 网络
一旦,所有的细节被输入,点击生成项目按钮将生成一个spring boot项目并下载它。接下来,解压下载的压缩文件并将其导入你最喜欢的IDE。
2. 包结构

一旦我们将生成的spring boot项目导入IDE,我们将看到一些自动生成的文件。参考上图了解项目结构。
3. pom.xml文件
<?xmlversion="1.0"encoding="UTF-8"?><project xmlns="http://maven.apache.org/POM/4.0.0"xmlns:xsi="http://www.w3.org/2001/XMLSchema-instance"xsi:schemaLocation="http://maven.apache.org/POM/4.0.0 http://maven.apache.org/xsd/maven-4.0.0.xsd"><modelVersion>4.0.0</modelVersion><groupId>net.guides.springboot2</groupId><artifactId>springboot2-logging</artifactId><version>0.0.1-SNAPSHOT</version><packaging>jar</packaging><name>springboot2-logging</name><description>Demo project for Spring Boot</description><parent><groupId>org.springframework.boot</groupId><artifactId>spring-boot-starter-parent</artifactId><version>2.0.4.RELEASE</version><relativePath /> <!-- lookup parent from repository --></parent><properties><project.build.sourceEncoding>UTF-8</project.build.sourceEncoding><project.reporting.outputEncoding>UTF-8</project.reporting.outputEncoding><java.version>1.8</java.version></properties><dependencies><dependency><groupId>org.springframework.boot</groupId><artifactId>spring-boot-starter-web</artifactId></dependency><dependency><groupId>org.springframework.boot</groupId><artifactId>spring-boot-starter-test</artifactId><scope>test</scope></dependency></dependencies><build><plugins><plugin><groupId>org.springframework.boot</groupId><artifactId>spring-boot-maven-plugin</artifactId></plugin></plugins></build></project>
4. Springboot2LoggingApplication.java文件
这个类提供了一个带有*public static void main(String[] args)*方法的入口,你可以运行它来启动应用程序。
import org.springframework.boot.SpringApplication;import org.springframework.boot.autoconfigure.SpringBootApplication;@SpringBootApplicationpublic class Springboot2LoggingApplication {public static void main(String[] args) {SpringApplication.run(Springboot2LoggingApplication.class, args);}}
5. 创建简单的POJO类 - Article.java
package net.guides.springboot2.springboot2logging;public class Article {private int id;private String name;public Article(int id, String name) {super();this.id = id;this.name = name;}public int getId() {return id;}public void setId(int id) {this.id = id;}public String getName() {return name;}public void setName(String name) {this.name = name;}}
6. 创建简单的服务类--ArticleService.java
package net.guides.springboot2.springboot2logging;import java.util.Arrays;import java.util.List;import org.slf4j.Logger;import org.slf4j.LoggerFactory;import org.springframework.stereotype.Service;@Servicepublic class ArticleService {private static final Logger logger = LoggerFactory.getLogger(ArticleService.class);public List<Article> getArticles(){logger.debug("inside getArticles() method");return Arrays.asList(new Article(100, "article"),new Article(200, "article2"));}}
注意,我们已经添加了slf4jLogger,也添加了调试语句。
private static final Logger logger = LoggerFactory.getLogger(ArticleService.class);
7. 创建简单的休息控制器 - ArticleController.java
package net.guides.springboot2.springboot2logging;import java.util.List;import org.slf4j.Logger;import org.slf4j.LoggerFactory;import org.springframework.beans.factory.annotation.Autowired;import org.springframework.web.bind.annotation.GetMapping;import org.springframework.web.bind.annotation.RestController;@RestControllerpublic class ArticleController {private static final Logger logger = LoggerFactory.getLogger(ArticleService.class);@Autowiredprivate ArticleService articleService;@GetMapping("/articles")public List<Article> getArticles() {logger.debug("inside ArticleController.getArticles() method");return articleService.getArticles();}}
注意,我们已经添加了slf4jLogger,也添加了调试语句。这些调试语句打印在控制台中。

8. application.properties文件
让我们在an application.properties文件中配置日志属性。打开一个application.properties文件,在其中添加以下日志配置。
9. 运行一个应用程序
现在将Springboot2LoggingApplication.java作为一个Java应用程序运行。调用REST API:http://localhost:8080/articles。你应该看到JSON格式的文章列表。
[{"id":100,"name":"article"},{"id":200,"name":"article2"}]
注意myapp.log文件在你正确的项目位置被创建。

版权说明 : 本文为转载文章, 版权归原作者所有 版权申明
原文链接 : https://www.javaguides.net/2018/09/spring-boot-2-logging-slf4j-logback-and-log4j-example.html
内容来源于网络,如有侵权,请联系作者删除!