Apollo学习(二): Java客户端使用
说明
本文主要是以springboot项目为基础,学习从Apollo配置中心获取值得使用方法。
正文
通过上篇《Apollo学习(一):在本地Windows系统下搭建Apollo配置中心》的学习,已经在本地快速搭建了一个Apollo配置中心,本篇通过构建springboot项目来学习配置中心的使用。本文主要依据官方文档来进行学习。
1.构建springboot项目
先通过start.spring.io构建springboot项目,选择添加web依赖,eureka client依赖,再添加Apollo客户端的依赖。
<dependency><groupId>org.springframework.boot</groupId><artifactId>spring-boot-starter-web</artifactId></dependency><dependency><groupId>org.springframework.cloud</groupId><artifactId>spring-cloud-starter-netflix-eureka-client</artifactId></dependency><dependency><groupId>com.ctrip.framework.apollo</groupId><artifactId>apollo-client</artifactId><version>1.0.0</version></dependency>
通过之前的学习,我们已经知道Apollo的configServer已经集成了eureka,它本身就是一个注册中心,通过将springboot项目注册到configserver用于服务发现。
Apollo客户端依赖于AppId,Apollo Meta Server等环境信息来工作。
AppId
首先AppId是应用的身份信息,必须是唯一的且类型为String,在配置中心新建项目时创建的AppId必须与要使用该配置的项目的AppId一致。
这里有三种方式设置AppId,优先级从高到低:
通过System Property, 在 IDEA中创建项目的Application,在VM options中指定AppId :
-Dapp.id=YOUR-APP-ID通过在application.properties文件中指定,
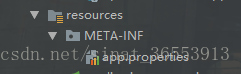
app.id=YOUR-APP-ID通过在resources文件下创建META-INF文件,在该目录下创建app.properties文件,在该文件指定AppId:
app.id=YOUR-APP-ID
Apollo Meta Server
Apollo支持应用在不同的环境有不同的配置,所以需要在运行时提供给Apollo客户端当前环境的Apollo Meta Server信息。默认情况下meta server和config server时部署在一个jvm进程中,所以meta地址就是config server的地址。
接下来,介绍几种常用的配置meta server的方式,详见官方文档。
优先级从高到低分别为:
- 通过Java System Property 在java的启动脚本中,在VM options中指定
-Dapollo.meta=http://config-service-url - 通过Spring Boot的配置文件
在application.properties或bootstrap.properties文件中指定apollo.meta=http://config-service-url - 通过在操作系统中的server.properties配置文件
Windows中,文件位置为C:\opt\settings\server.properties,在其中配置apollo.meta=http://config-service-url - 通过在app.properties配置文件中指定
apollo.meta=http://config-service-url
Environment
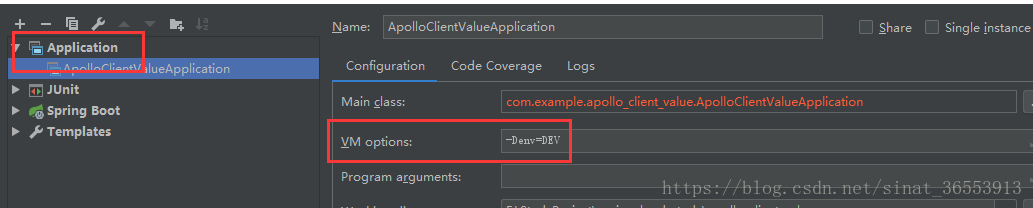
指定程序的运行环境,这里配置为DEV 也就是开发环境。介绍常用的几种配置方式:
- 通过Java System Property 在java的启动脚本,在VM options中指定
-Denv=DEV - 通过系统的配置文件 在C:\opt\settings\server.properties中配置
env=DEV
在启动类添加注解
在启动类上添加@EnableDiscoveryClient和@EnableApolloConfig注解
@EnableDiscoveryClient@EnableApolloConfig@SpringBootApplicationpublic class ApolloClientValueApplication {public static void main(String[] args) {SpringApplication.run(ApolloClientValueApplication.class, args);}}
构建项目的基础配置介绍完毕,接下来学习客户端的用法
2.客户端的使用
Apollo支持API方式和Spring方式。
API方式灵活,功能完备,配置值实时更新(热发布),支持所有java环境。
Spring有多种方式,如Placeholder、Spring Boot的@ConfigurationProperties方式、和API结合的方式。
API
API是最简单,高效使用Apollo配置的方式,不依赖Spring矿建即可使用。
以下代码在springboot中演示如何使用Config得到配置,其他的详细的使用方法详见官方文档
@Componentpublic class GetValueByAPI {@PostConstructpublic void getValue(){Config config = ConfigService.getAppConfig();String key = "changeKey";String defaultValue = "apollo_client";zhujie String value = config.getProperty(key,defaultValue);System.out.println(String.format("value is %s",value));}}
Spring
配置这里只介绍基于java的配置和在Spring Boot初始bootstrap阶段注入配置
基于java配置
基于java配置有两个重要的注解,@EnableApolloConfig和@Configuration,这两个注解必须同时使用,否则不会生效。
以下代码是注入默认namespace到spring中
@Configuration@EnableApolloConfig(order = 1)public class JavaConfig {@Beanpublic ConfigJavaBean configJavaBean(){ConfigJavaBean configJavaBean = new ConfigJavaBean();return configJavaBean;}}
namespace就相当于在项目中区分不同的配置文件,如redis.properties,mongo.properties.默认的namespace就如application.properties,namespace有私有和公有,公有的namespace所有的项目都可以读的,私有的只有本项目可以使用,并且如果公有的namespace和私有的namespace中有相同的key,私用的会覆盖公有中的值。
通过@EnableApolloConfig来加载不同的namesapce
@Configuration@EnableApolloConfig(value = {"javaconfig"},order = 2)public class JavaConfigDiffNS {@Beanpublic ConfigJavaBean2 configJavaBean2(){return new ConfigJavaBean2();}}
同时可以通过Order来指定配置顺序,值越低优先级越高。
这里要注意当有不同namespace,且其中有相同的key, 私有的namespace中的值会覆盖公有的,order顺序在此时不起作用,也就是低优先级的不会覆盖高优先级。但当不同的namespace都是私有的,这时order值决定使用的值,低优先级namespace中会覆盖掉高优先级中相同key的值
在Spring Boot初始bootstrap阶段注入配置
什么时候需要在初始bootstrap阶段注入配置?
当springboot启动时需要提早准备好其他bean的初始化条件,如使用@ConditionalOnProperty或某些starter启动阶段需要读取配置。
通常使用以下方式来进行配置:
在bootstrap.properties中注入默认namespace ,通过apollo.bootstrap.enabled = true,其他的namespace可以通过apollo.bootstrap.namespaces = application,othernamespace
如何配置介绍完后,接下来介绍怎么使用配置,怎么从Apollo配置中心读取配置信息。上面介绍了API的方式,直接使用Config对象的方法,在spring中Apollo也提供了多种方式。
Placeholder方式
该方式的使用基本格式为@Value("${key:defaultValue}"),建议在实际使用时尽量给出默认值,以免由于key没有定义导致运行时错误。 从v0.10.0开始的版本支持placeholder在运行时自动更新
public class ConfigJavaBean {@Value("${oneKey:defaultValue}")private String oneKey;@Value("${twoKey:22}")private String twoKey;public String getOneKey() {return oneKey;}public void setOneKey(String oneKey) {this.oneKey = oneKey;}public String getTwoKey() {return twoKey;}public void setTwoKey(String twoKey) {this.twoKey = twoKey;}}
@ConfigurationOnProperties方式
@ConfigurationProperties(prefix = "redis")public class RedisConInfo {private String host;private String port;public String getHost() {return host;}public void setHost(String host) {this.host = host;}public String getPort() {return port;}public void setPort(String port) {this.port = port;}}
进行配置
@Configuration@EnableApolloConfig(value = {"redis"},order = 3)public class RedisConfig {@Bean@RefreshScopepublic RedisConInfo redisConInfo(){return new RedisConInfo();}}
使用这种方式若需要在Apollo配置变化时自动更新,需要配合Spring Cloud的RefreshScope使用
@Componentpublic class RedisConfigRefresh {private static final Logger logger = LoggerFactory.getLogger(RedisConfigRefresh.class);@Autowiredprivate RedisConInfo redisConInfo;@Autowiredprivate RefreshScope refreshScope;@ApolloConfigChangeListener({"redis"})public void onChange(ConfigChangeEvent changeEvent){boolean ischanged = false;for(String changeKey : changeEvent.changedKeys()){if(changeKey.startsWith("redis")){ischanged = true;break;}}if(!ischanged){return;}logger.info("before refresh {}",redisConInfo.getHost() + " : " + redisConInfo.getPort());refreshScope.refresh("redisConInfo");// refreshScope.refreshAll(); //refresh alllogger.info("after refresh {}",redisConInfo.getHost() + " : " + redisConInfo.getPort());}}
注意 必须在配置信息的bean上添加 @RefreshScope注解
Annotation
主要是@ApolloConfig 用来自动注入Config对象和@ApolloConfigChangeListener来自动注入ConfigChangeListener
@Configuration@EnableApolloConfig({"mongo"})public class MongoConfigAnno {private static final Logger logger = LoggerFactory.getLogger(MongoConfigAnno.class);@ApolloConfig("mongo") //inject config for namespace mongoprivate Config config;@Value("${mongo.host:localhost}")private String host;@Value("${mongo.port:1234}")private String port;public String getHost() {return host;}public String getPort() {return port;}@ApolloConfigChangeListener("mongo")private void someOnChange(ConfigChangeEvent changeEvent){logger.info("before update {} ",this.toString());if(changeEvent.isChanged("mongo.host")){this.host = config.getProperty("mongo.host","defaultValue");}if(changeEvent.isChanged("mongo.port")){this.port = config.getProperty("mongo.port","1234");}logger.info("after update {} ",this.toString());}@Overridepublic String toString() {return String.format("mongo configuration--- host: %s port: %s",this.host,this.port);}}
源码地址:https://github.com/Edenwds/springcloud_study/tree/master/apollo_client_value
版权说明 : 本文为转载文章, 版权归原作者所有 版权申明
原文链接 : https://blog.csdn.net/sinat_36553913/article/details/82936764
内容来源于网络,如有侵权,请联系作者删除!