文章26 | 阅读 15634 | 点赞0
swift详解之十九--------------UITableView的基本操作(下拉刷新,新增删除,分组,检索等)
UITableView的基本操作(下拉刷新,新增删除,分组,检索等)
注:本小结总结UITableview的一些基本用法
UITbleView继承自UIScrollView,只能用来显示一列数据(目前就只认识到这里),纵向滑动。
一般有两种方式来实现,直接用UITableViewController , 占满整个屏幕 。不用手动实现UITableViewDataSource 和UITableViewDelegate 。另一种方式在UIViewController 中。我们看看这种方式
let table = UITableView()table.frame = self.view.frameself.view = tabletable.delegate = selftable.dataSource = self
这里新建了一个UITableView ,并且将其frame设置成当前view的frame大小 。也就是占满屏幕 。当然这里 你也可以设置你需要的大小, 下面的两句就是将它的代理和数据源的协议 设置成当前对象 当然我们的viewcontroller是实现了这两个协议的。class ViewController: UIViewController , UITableViewDataSource , UITableViewDelegate
然后,把这个tableview添加到当前view上 或者直接把当前view赋值成它。
下面看几个主要的代理方法
//返回多少个sectionfunc numberOfSectionsInTableView(tableView: UITableView) -> Int {return 3}
返回section数, section相当于分组 ,也就是这里table分成几组 。我们这里分三组演示。
func tableView(tableView: UITableView, numberOfRowsInSection section: Int) -> Int {switch section {case 0 :return arr.countcase 1:return arr1.countcase 2:return arr2.countdefault:return 0}}
然后这个方法就是每组的元素个数 。这里我们用了三个数组
func initData(){arr.addObject("ssssddd")arr.addObject("唱什么")arr.addObject("what ")arr.addObject("ssshenme dd")arr1.addObject("我是二部的")arr2.addObject("我是第三个部门的")arr2.addObject("我是第三个部门的1")}
我们在这里初始化了这三个数组 。在viewDidLoad 下调用。
func tableView(tableView: UITableView, cellForRowAtIndexPath indexPath: NSIndexPath) -> UITableViewCell {let strCell = "cell"var cell = tableView.dequeueReusableCellWithIdentifier(strCell)if cell == nil{cell = UITableViewCell(style: UITableViewCellStyle.Subtitle, reuseIdentifier: strCell)}switch indexPath.section{case 0 :cell!.textLabel?.text = arr[indexPath.row] as? Stringcase 1:cell!.textLabel?.text = arr1[indexPath.row] as? Stringcase 2:cell!.textLabel?.text = arr2[indexPath.row] as? Stringdefault:cell!.textLabel?.text = ""}//cell!.textLabel?.text = arr[indexPath.row] as? Stringcell!.backgroundColor=UIColor.purpleColor()cell?.contentView.backgroundColor = UIColor.grayColor()return cell!}
这个也是最主要的方法 ,给cell赋值 。这里先从tableView.dequeueReusableCellWithIdentifier 这个里面去取 , 没有的时候 才会去新建 ,因为下载过的数据是回缓存起来的。我们需要先从缓存池里面找。找不到采取新建,这样会比较流畅。
var refreshControl:UIRefreshControl?
这里我们声明一个刷新控件
self.refreshControl = UIRefreshControl()self.refreshControl?.addTarget(self, action: "onPullToFresh", forControlEvents: UIControlEvents.ValueChanged)self.refreshControl?.attributedTitle=NSAttributedString(string: "松手就可以刷新啦")self.table.addSubview(refreshControl!)
这里设置下舒心控件的属性和给它注册方法onPullToFresh
func onPullToFresh(){//下拉刷新dispatch_async(dispatch_get_global_queue(DISPATCH_QUEUE_PRIORITY_DEFAULT, 0)) {self.arr.addObject("ssssddd")self.arr1.addObject("唱什么")self.arr2.addObject("what ")self.arr1.addObject("ssshenme dd")dispatch_async(dispatch_get_main_queue(), {self.table.reloadData()self.refreshControl?.endRefreshing()})}}
这个下拉刷新,先去异步添加数据 ,我们这里是手动添加进去的,但是实际应用中往往需要从网络去下载数据,所以比较慢,用异步会比较合适。下载完成后,回到主线程去重新加载数据 , 最后停止下拉刷新控件 。
table.editing = true
这里我们设置这个属性后, tableview可以编辑 , 新增删除等 。(不加这个属性只能左划删除 )
func tableView(tableView: UITableView, commitEditingStyle editingStyle: UITableViewCellEditingStyle, forRowAtIndexPath indexPath: NSIndexPath) {if(editingStyle == UITableViewCellEditingStyle.Delete){ //deleteswitch indexPath.section {case 0 :arr.removeObjectAtIndex(indexPath.row)case 1:arr1.removeObjectAtIndex(indexPath.row)case 2:arr2.removeObjectAtIndex(indexPath.row)default:print("no")}tableView.deleteRowsAtIndexPaths([indexPath], withRowAnimation: UITableViewRowAnimation.Fade)}else if(editingStyle == UITableViewCellEditingStyle.Insert){switch indexPath.section {case 0 :arr.insertObject("新增的❤️", atIndex: indexPath.row+1)case 1:arr1.insertObject("新增的❤️", atIndex: indexPath.row+1)case 2:arr2.insertObject("新增的❤️", atIndex: indexPath.row+1)default:print("no")}let zyIndexPath = NSIndexPath (forRow: indexPath.row+1, inSection: indexPath.section)tableView.insertRowsAtIndexPaths([zyIndexPath], withRowAnimation: UITableViewRowAnimation.Middle)}}func tableView(tableView: UITableView, editingStyleForRowAtIndexPath indexPath: NSIndexPath) -> UITableViewCellEditingStyle {if(indexPath.row % 2 == 1){return UITableViewCellEditingStyle.Insert}else{return UITableViewCellEditingStyle.Delete}}
然后再实现这两个方法。看下效果 、
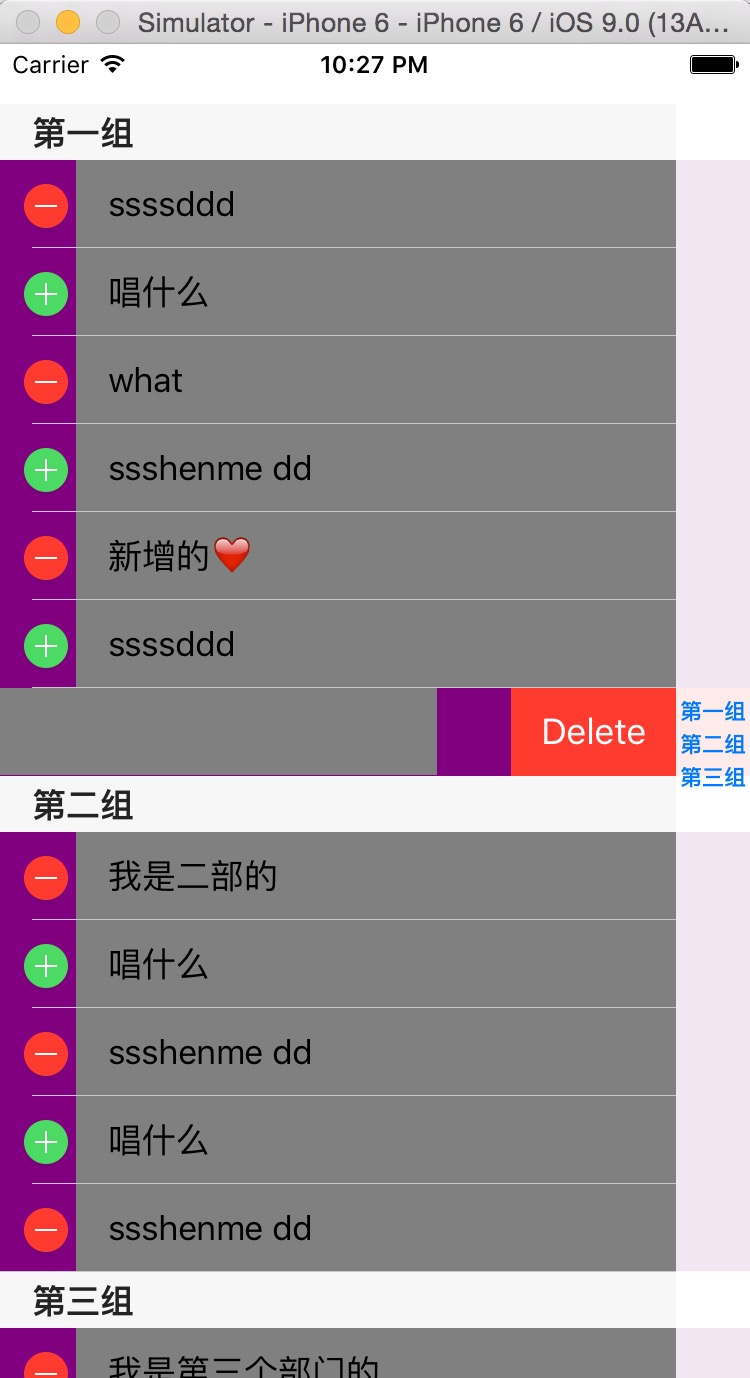
这里可以新增和删除 。
旁边的检索这个方法
func sectionIndexTitlesForTableView(tableView: UITableView) -> [String]? {return ["第一组","第二组","第三组"]}
点击可以用这个方法
func tableView(tableView: UITableView, didSelectRowAtIndexPath indexPath: NSIndexPath) {print("我点击了第\(indexPath.section)部分,第\(indexPath.row)行")}
当然还有很多方法。大家可以输入tableview 会提示很多,大家可以去试试。这里不再赘述。
还是放上源码 :UITableView基本用法大全
学习iOS,有他就够了,小码哥视频,传智、黑马、各种swift书籍
版权说明 : 本文为转载文章, 版权归原作者所有 版权申明
原文链接 : https://blog.csdn.net/u010586842/article/details/48141887
内容来源于网络,如有侵权,请联系作者删除!